HOW TO GROW PYRACANTHA 'Mohave'

How to grow Pyracantha 'Mohave' - ashwoodnurseries.com


Commonly known as the Firethorn (and for good reason), Pyracantha 'Mohave' is a popular garden wall shrub noted for its ornamental blooms and berries. First raised in the US National Arboretum, Washington in 1963, it is a hybrid between Pyracantha coccinea 'Wyatt' and Pyracantha koidzumii. It was given the cultivar name 'Mohave and release for general cultivation in May, 1970.

How to grow Pyracantha 'Mohave'
It is a dense, medium sized specimen which under favourable conditions can be expected to grow to between 4-5 metres. It has an evergreen to semi-evergreen habit with large, glossy deep-green foliage and spines on the leafy shoots. Masses of small white to creamy white blooms appear in clusters (corymbs) from early May-June. These are followed by glossy, long-lasting, bright orange-red berries. These will show from mid August onwards and ripen soon after development. The berries will remain on the plant over the winter unless picked of by birds.

Pyracantha 'Mohave' is a robust form and able to succeed in almost any landscape situation. It will be happy in both full sun and partial shade, but will flower and berry best in full sun. Plant in any fertile, well-drained soil, but it will perform best in well-drained, reliably moist soils with a pH of 6.0–6.5. It is not recommended to add organic matter or fertiliser to the planting hole. As Pyracantha 'Mohave' matures it will become increasingly drought tolerant. Avoid areas prone to prone to waterlogging.

How to grow Pyracantha 'Mohave'
When grown as a wall shrub, plant at least 50 cm out from the wall to avoid the dry area at the base. Be aware that Pyracanthas bloom on shoots produced the previous year. So when pruning retain as much of the two-year-old wood as possible. Shorten all side shoots that arise from the main framework of branches in late summer (do not the clusters of berries), as this will allow the following seasons berries to appear more visible.

Feed in late winter, with a balanced general purpose fertiliser followed by a thick mulch of well-rotted garden compost or farm manures. Avoid having the mulch touching the trunk to reduce the incidence of disease.

Unlike a number of the other forms of Pyracantha available, Pyracantha 'Mohave' has proven to be particularly resistant to both scab and fireblight.

Pyracantha 'Mohave' received the Award of Garden Merit from the Royal Horticultural Society in 1984.

For related articles click onto the following links:

HOW TO GROW CLEMATIS ARMANDII

How to grow Clematis armandii - Emmanuel Touzery CC BY-SA 4.0

With all the large-flowered clematis hybrids becoming increasingly susceptible to Clematis wilt, most people's specimens end up spending the year looking little more than a thatch of dried stems. So to save years of disappointment, you are likely to get far more ornamental value from the other species, cultivars and alternative hybrids.

How to grow Clematis armandii
Arguably one of the best is the evergreen Clematis armandii, along with its various selected cultivars, my plant of choice is the pure-white flowered 'Snowdrift' which received the Award of Garden Merit from the Royal Horticultural Society in 1984.

Native to central and western China, Clematis armandii is a strong growing, evergreen climber noted for it early blooming. Under favourable conditions you can expect the stems to reach a length of 4.5-6 metres long. Reminiscent of the deciduous species, the dark-green, glossy leave are composed of three leathery leaflets Each one can be up to 15 cm long. The creamy which flowers of the true species are between 5-6.5 cm across and are carried in axillary clusters during April or early May. Occasional blooms can appear from November onwards.

How to grow Clematis armandii
Clematis armandii will flower at its best when grown in full sun however it will be quite happy growing in semi-shade. It is ideal for a warm south or south-west facing wall with protection from cold winds. Grow in any moist, fertile, well-drained soil, though preferably one with either an alkaline or neutral pH. Mulch the base of the plant with well-rotted garden compost or farm manure but avoid having the mulch touching the stem.

Unlike the large flowering hybrids you do not need to bury the root ball below the soil level, plant Clematis armandii with the crown at soil level.

In coastal regions the leaf tips can take on a burnt appearance if grown in salty soil or salty water.

Clematis armandii was first brought to the attention of English gardeners in 1900 by renowned plant hunter Ernest Henry 'Chinese' Wilson (1876 – 1930), then subsequently received the First Class Certificate (FCC) from the Royal Horticultural Society.

For related articles click onto the following links:
CLEMATIS TANGUTICA

HOW TO GROW HAMAMELIS MOLLIS

How to grow Hamamelis mollis - http://www.treeseedonline.com/

Commonly known as the chinese witch hazel, Hamamelis mollis is a ornamental, deciduous flowering plant noted for its unusual winter blooms. Native to central and eastern China, it was first introduced to western science in 1879 by English botanist and plant collector Charles Maries (1851 - 1902), and then much later by the notable plant hunter Ernest Henry 'Chinese' Wilson (1876 – 1930).

How to grow Hamamelis mollis
Arguably the most handsome of all species and cultivars, and certainly the most popular, Hamamelis mollis is a large shrub which under favourable conditions can be expected to grow to approximately 8 metres tall! However in the United Kingdom you are more likely to see mature specimens between 2.5-4 metres in height.

The mid-dark green leaves are large ( 8–15 cm long and 6–10 cm wide), ovoid and softly hairy. They also provide some reasonable autumn colour turing a pleasing butter-yellow colour before falling. From December onwards and usually after leaf drop clusters of fragrant, ribbon-shaped blooms appear. The petals are 15 mm long and borne in groups of four from a red-tinged base. Once pollinated, hard woody seed capsules are formed, each containing 2 shiny black seeds. These seed pods are approximately 12 mm long, and once mature will split explosively ejecting the seeds some distance away from the parent plant.

As with many Chinese origin plants, Hamamelis mollis is easy to grow in the United Kingdom. Position in an open but unexposed site. For best flowering plant in full sun although this species will quite happily grow in semi-shade. It will perform best in moist, acidic, well-drained, humus-rich soils. So long as these conditions are met they will even do well on chalk! Be aware that leaf-scorch can occur during periods of summer drought.

For grafted examples, keep an eye on root suckers emerging at the base of the trunk and remove them by tearing them away from the base as soon as they are large enough to grip.

For related articles click onto the following links:
HOW TO GROW DAPHNE BHOLUA 'Jacqueline Postill'
HOW TO GROW EXOCHORDA x MACRANTHA 'The Bride'
HOW TO GROW HAMAMELIS MOLLIS
HOW TO GROW WITCH-HAZEL - Hamamelis species
HOW TO GROW WITCH HAZEL FROM SEED - Hamamelis species
THE FIREWHEEL TREE - Stenocarpus sinuatus
The Witch-Hazel - Hamamelis species

HOW TO GROW A PEACH TREE FROM A STONE?

How to grow peach tree from a stone - Jack Dykinga, USDA


The peach tree - Prunus persica, is a hardy deciduous plant native to Northeast China. Be that as it may, the species name persica refers to its widespread cultivation in Persia (modern–day Iran).

How to grow a peach tree from a stone - http://farm4.static.flickr.com/
It is a popular garden fruit tree due to its edible juicy fruit commonly known as a peach. The similar-looking nectarine is a smooth-skinned sport (mutation) of the peach, but has proven to be less hardy.

Unlike many other genera of commonly grown fruit trees, peaches are among the few fruits which can provide good results when propagated from seed, including those of imported supermarket fruits!

The best time to sow peach stones in from September to October. Prior to sowing, remove the stone from the fruit and place it in a bowl of water to soak off any of the remaining fleshy pulp. This is important as the pulp contains germination inhibitors.

If the stone floats then it is not viable so only sow stones which have sunk. Air dry the stones for a day or so then remove the seed from within the stone before sowing using a nut cracker. Try to avoid damaging the seed. Sometimes you can even find seeds germinating while still in the stone!

How to grow a peach from a stone - https://st.hzcdn.com/
Set each seed singularly in individual 13 cm pots containing a good quality compost such as John Innes 'No.1'. leave a 5 cm gap between the surface of the compost and the top of the pot and position the stone 5 cm below the surface. Gently water the compost, then fill the 5 cm gap above it with a dry mulch such as straw or horticultural grade gravel.

Place your pots outside into a cold frame or greenhouse. If possible, and to speed up germination times, maintain a minimum temperature of approximately 7-10 degrees Celsius. Allow the compost to dry out before watering. Come the spring all viable seedlings should have emerged.

Pot on once the root system as established in the pot using a loam-based potting compost such as John Innes No 3. Avoid disturbing the roots.

When planting outside into their final position, peaches generally perform best when fan trained against a south or south-west facing wall. To avoid the fruit skins from splitting over the summer, plant into a moisture retentive, well-drained soil. Do not allow the soil to dry out of the summer and avoid irregular watering.

For related articles click onto the following links:
HOW TO GROW A PEACH TREE FROM A STONE?
HOW TO GROW SHARON FRUIT - Diospyros kaki
Why are the Leaves on my Peach Tree Curling?

HOW TO GROW MUSA BASJOO


How to grow Musa basjoo
Commonly known as the Japanese banana, Musa basjoo is a popular ornamental herbaceous perennial with trunk-like pseudostems. Although originating from southern China, it was first discovered for western science on the Japanese islands of Ryukyu - hence the common name.

Under favourable conditions you can expect Musa basjoo to grow to approximately 2–2.5 metres tall. The mid-green, paddle-shaped leaves can be up to 2 metres long and 70cm wide once mature. This species is monoecious meaning that it produces male and female flowers on the same arching inflorescence (flower head). The inflorescence can extend from the pseudostems for over 1 metre. The banana fruit formed are yellow-green, around 5–10 cm (2.0–3.9 in) long and 2–3 cm (0.79–1.18 in) broad; they are inedible, with sparse white pulp and many black seeds.

Of the approximately 70 species of banana within the genus Musa, Musa basjoo has proven to the hardiest. So much so that it can be left outside with minimal cold protection in the milder regions of the UK. The roots are proven to be surprisingly frost hardy and able to withstand temperatures as low as −10 °C! The exposed pseudostems will suffer damage once temperatures go below few degrees below freezing, so it is always advisable to protect them with a 'breathable' insulation such as straw secured within a wire frame or multiple layers of fleece.

Bubble wrap isn't really suitable as condensation can build up within the wrapping, increasing the incidence of fungal rots. If the pseudostem is killed, the banana will resprout from the ground in the following spring when it can grow rapidly grows to full size in a season.

How to grow Musa basjoo - https://hometropicals.files.wordpress.com/
To allow the plant to make the most of the growing season and establish a decent sized root system before the winter plant as soon as the threat of late frost has passed in late spring. To prevent leaves being being shredded, choose a sheltered site protected from strong winds. If possible, position Musa basjoo on a site which slopes away slightly from the plant to help avoid planting it in a frost pocket.

Musa basjoo will perform best when planted in a well-drained soil, previously enriched with organic matter such as well-rotted farm manures or garden composts. They require full sun, and over the growing season may be watered and feed generously to achieve the best foliage.

Under favourable conditions, specimens grown in mediterranean and subtropical regions can expect Musa basjoo to come into bloom from 12–24 months. It is not unknown for them to flower in the UK in exceptionally mild years. Unfortunately the subsequent yellow-green fruits are inedible.

For related articles click onto the following links:
BANANA PLANTS

HOW TO GROW FICUS PUMILA

How to grow Ficus pumila


Commonly known as the creeping or climbing fig, Ficus pumila is cultivated as an ornamental garden vine in subtropical regions or as a houseplant in temperate regions. Native to China, Japan, and Vietnam it is a woody evergreen with particularly small leaves. In fact the species name 'pumila' is a derivation of the Latin word for 'dwarf'. This refers to the juvenile growth which bears small, ovate or heart-shaped leaves of no more than 2.5 cm. As the plants develops into its mature growth larger leaves up to 10 cm are produced along with flowers and fruits.

How to grow Ficus pumila - Venice Beach House
Ficus pumila was introduced to western science in 1721. It was first described and named as Ficus stipulata in 1753 by Carl Linnaeus (1707 –1778). The current name is the result of a re-classification in 1786 by Swedish naturalist Carl Peter Thunberg (1743 – 1828)

Under favorable conditions Ficus pumila is capable of reaching a height of between 2.5-4 metres. In its native environment it climbs the trunks of trees similar in habit to that of ivy. However, as you can see by the accompanying image, property will also provide a suitable support structure. Be aware that the adhesive aerial tendrils can cling or root in, and damage the structure and surface finishes on wooden supports.

Grow Ficus pumila outdoors in humus-rich, moist,but well-drained soil. It will perform best in full sun in a sheltered position, however it will also tolerate partial shade. Avoid exposed areas and planting outside in regions prone to frost.

Specimens grown as house or conservatory plants will perform well in a good quality loam-based compost such as John Innes 'No.2 or 3'. Provide full sun or filtered light, but provide some shade during the height of summer. Maintain a temperature range of between 13 - 24°C for continuous growth. Container grown specimens can be repotted every couple of years. Water regularly and apply a liquid soluble fertiliser once a month during the growing season. Reduce watering over the autumn and winter. Flowers are rarely produced on plants grown under protection.
The Venice Beach House image credit - Warren Wilson

For related articles click onto the following links:

HOW TO GROW STROMANTHE SANGUINEA 'Triostar'

How to grow Stromanthe sanguinea 'Triostar' 


Stromanthe sanguinea 'Triostar' is a highly ornamental foliage plant grown as a houseplant or greenhouse specimen in northern Europe, or as a garden plant in subtropical to tropical climates. The original species is native to the rainforests of Brazil, thriving in the damp, shaded conditions of the forest floor. Like many species from the family Marantaceae the leaves characteristically fold up over night as if in prayer.

Stromanthe sanguinea 'Triostar' flowers
Under favorable conditions, you can expect indoor specimens of Stromanthe sanguinea 'Triostar' to reach a height of between 60 to 90 cm. However heights up to 1.5 metres can be expected when grown outside!

The dark green leaves are oblong to lance-shaped and variegated in striking shades of pink, red, white. The underneath of the leaf has a wine-red pigmentation which backs specialist mirror-like cells. In the low light levels of the forest floor these cells reflect light back to chlorophyll-filled plant cells. The species name 'sanguinea' means 'blood-red' and is a description of the leaf underside. In the spring reddish-pink flowers can appear.

Stromanthe sanguinea illustration
When grown as a houseplant, Stromanthe sanguinea 'Triostar' will perform well in a good quality potting compost such as John Innes 'No.2' or a proprietary peat based compost. Position in a warm bright room, but one which does not receive direct sunlight. Especially from April until October. Maintain a minimum winter temperature of 13 degrees Celsius and avoid those below 10 degrees Celsius.

During the growing season provide humid conditions by regularly spraying the foliage with tepid water - preferably clean, collected rainwater to prevent water marks.

Water freely from March to September, but allow the top 5 cm or so of compost to dry out between watering during the rest of the year.

Re-pot established plants in April and feed every two weeks with a liquid soluble fertilizer.

Specimens grown outside will need a moist, free draining soil that is known to not dry out over the summer. They will require full shade to semi-shade as the foliage is easily scorched.

For related articles click onto the following links:
HOW TO GROW AECHMEA FASCIATA
HOW TO GROW FICUS PUMILA
HOW TO GROW STROMANTHE SANGUINEA 'Triostar'
HOW TO GROW THE SWISS CHEESE PLANT - Monstera deliciosa

HOW TO GROW THE SWISS CHEESE PLANT - Monstera deliciosa

Mature leaves of the Swiss cheese plant - Monstera deliciosa
How to grow the Swiss cheese plant - Monstera deliciosa

The Swiss cheese plant - Monstera deliciosa, is a highly ornamental climbing plant and popular, although arguably inappropriate, houseplant. Despite its common name it is not native to Switzerland and neither does it taste of cheese, although the edible fruits are said to have a taste which resembles fruit salad!

The unusual common name refers to the elongated holes which appear in the mature leaves. Large leaves are prone to tearing during tropical storms and so this particular species has evolved these characteristic holes as a method of damage limitation. Some types of Swiss cheese are also riddled with holes, hence the association.

Unfortunately flowering is rare (but not unheard of) when grown indoors and so you are unlikely to produce fruits unless suitable conditions can be provided outside.

Native to the tropical rainforests of southern Mexico, and further south to Panama, it does not grow solely with its roots in the ground like most regular plants. It is instead an epiphytic plant, which is one that grows harmlessly upon another plant (in this case a tree) and receives its moisture and nutrients from the air, rain, and the debris which can accumulate around its aerial roots.

In its native habitat, seedlings of the Swiss cheese plant will naturally grow towards the darkest area within their surrounding until they find a tree trunk. It is this tolerance to heavy shade which is why mature plants are so suitable for indoor conditions.

Swiss cheese plant - Monstera deliciosa adventitious roots
Swiss cheese plant root system- Monstera deliciosa
You can grow the Swiss cheese plant outdoors in a humus-rich, moist but well-drained garden soil. It will require a shaded or partially shaded position in a sheltered frost-free area. It will perform best between 20–30 °Celsius, but be aware that growth will stop in temperature below 10 °Celsius. The Swiss cheese plant has no tolerance to frost and will die in freezing conditions.

When grown as a houseplant or for interior decoration in public buildings, plant in a good quality loam-based compost such as John Innes 'No 2 or No 3'. Due to its climbing habit support will also need to be put in place. For large pots a decent moss pole will be suffice but only up until the specimen has outgrown its place. More substantial supports will need to be considered if the plant is to remain in situ. Provide bright, indirect light with moderate to high humidity. Direct sun can scorch and possibly cause yellowing of the leaves.

Swiss cheese with holes in
Swiss cheese - http://journalthis.danoah.com/
In dry atmospheres regularly spray with room temperature water and consider providing a saucer containing damp expanded clay balls. Due to the extensive aerial root system Swiss cheese plants will require suitably large pots. so when watering, make sure that all of the compost is evenly moist. Allow the top 5-10 centimetres of compost to dry out before watering again.

Feed with a good quality liquid soluble fertiliser once a month during the growing season.

Given favourable growing conditions the Swiss cheese plant can grow to approximately 20 meters high. So once it has reached a size that no longer provides ornamental value you may wish to consider replacing the plant for a smaller specimen or cutting it down to a more suitable size. Heavy pruning can also lose the plants ornamental value.

For related articles click onto the following links:
HOW TO GROW AECHMEA FASCIATA
HOW TO GROW FICUS PUMILA
HOW TO GROW STROMANTHE SANGUINEA 'Triostar'
HOW TO GROW THE SWISS CHEESE PLANT - Monstera deliciosa
SWISS CHEESE PLANT - Monstera deliciosa

SKIMMIA ANQUETILIA

Skimmia species


Native to the Himalayas, Skimmia anquetilia is a small evergreen, frost-hardy shrub of open habit, and noted for its decorative fruits and bright pink flowers. The first recorded introduction of this species to English cultivation was in 1841 when British botanist Dr Royle (1798 – 1858) sent seeds to the Horticultural Society at Chiswick. Previously and incorrectly known as Skimmia laureola, it is now correctly named and described in 1980 by British botanists Nigel Paul Taylor (born 1956) and Herbert Kenneth Airy Shaw (1902 – 1985).

Under favourable conditions you can expect Skimmia anquetilia to grow to no more than approximately 2m. Strangely, individual seed-grown specimens can display a prostrate habit which have an overall height of just 30cm.

The leathery, pale yellow-green leaves are oblanceolate, taper-pointed and approximately 7.5-15 cm long. A member of the family Rutaceae, they will emit a strong pungent smell when crushed.

The terminal clusters of greenish-yellow flowers are unpleasantly scented and small in relation to the size of the leaves. These blooms are borne in the spring. Once pollinated, and on female forms only, these are followed by dull red fruits.

Skimmia anquetilia is tolerant of shade and an excellent choice for coastal gardens and industrial regions. Plant in a moist, free-draining soil. It will perform best in a humus-rich, acidic soil.

Skimmia anquetilia received the Award of Merit from the Royal Horticultural Society in 1977.

For related articles click onto the following links:
HOW TO GROW GRISELINIA LITTORALIS 'Variegata'
HOW TO GROW GRISELINIA LUCIDA
HOW TO GROW PHOTINIA RED ROBIN
HOW TO GROW SKIMMIA JAPONICA 'RUBELLA'
HOW TO GROW SKIMMIA REEVESIANA
SKIMMIA ANQUETILIA
SKIMMIA JAPONICA 'RUBELLA'
SKIMMIA JAPONICA RUBELLA CARE
SKIMMIA REEVESIANA

HOW TO GROW WITCH HAZEL FROM SEED - Hamamelis species

How to grow witch hazel from seed

The Witch hazel, Hamamelis species and cultivar, is a popular deciduous garden plant noted for its unusual winter blooms. Most species are associated with North America, however there are two further lesser-known species, one in Japan the other in China.

Witch hazel seed pods - https://nhgardensolutions.files.wordpress.com/
Hybrids of Hamamelis japonica and Hamamelis mollis have proven to be the most popular as garden plants due to their relatively small size and spider-like yellow or reddish flower which appear after leaf-drop in the winter.

The 'Witch' in witch-hazel is a derivative of the Old English word 'wice' which means pliant or bendable. The hazel' part is simply due to the foliage looking similar to that of the native European hazel - Corylus species.

Witch hazel seeds are easy to collect during the early autumn. Be aware that the seed pods do have a habit of explosively shooting out their seeds so it is easier to collect unopened capsules and bring them into a warm, dry place inside a fine mesh bag. Once the seeds are released they are best sown immediately.

Freshly collected seeds will have a high germination rate and can be expected to emerge after about 18 months to two years. Packaged seeds will not only have a lower germination rate but will also take longer to germinate.

Witch hazel seedlings - http://www.whiteoaknursery.biz/
Using 7-9 cm pots, fill with a good quality seed compost such as John Innes 'Seed and Cutting'. Gently compress the compost into the pot and then press one seed into the surface of each pot. Avoid burying the seed, and then cover the seed with a thin layer of horticultural grit. Gently water in and the place in a heated propagator for approximately 8 weeks at approximately 24 degrees Celsius. Keep the compost moist throughout this period. Alternatively seal the pots inside a clear polythene bag and place on a warm, bright windowsill. After this period move the pots outside into a bright cold frame for the winter period. Allow the surface of the compost to dry out between waterings to prevent fungal growth, However make sure that the compost below the surface remains moist.

As the seedlings emerged they can be removed for the cold frame and positioned in a sheltered out of direct sunlight. They can then be hardened off for a couple of weeks before placing in full sun and potted on as necessary.

For related articles click onto the following links:
HOW TO GROW HAMAMELIS MOLLIS
HOW TO GROW WITCH-HAZEL - Hamamelis species
HOW TO GROW WITCH HAZEL FROM SEED - Hamamelis species
THE FIREWHEEL TREE - Stenocarpus sinuatus
The Witch-Hazel - Hamamelis species

HOW TO GROW SKIMMIA REEVESIANA

How to grow Skimmia reevesiana


Skimmia reevesiana is an ornamental, evergreen shrub noted for its compact growth and ornamental berries. Native to South China and Southeast Asia it forms a low mound with mature specimens growing to an approximate height of between 0.9-1.5 metres.

How to grow Skimmia reevesiana
The aromatic glossy leaves are narrowly elliptic with a pale margin. The small white-yellowish blooms appear on terminal panicles in May. On female forms the pollinated flowers give way to long lasting, ovoid, matt crimson-red berries.

Plant Skimmia reevesiana in September and October or in March and April.

Grow Skimmia reevesiana in a moist but well-drained soil. It will perform best when planted in a shady or partially shaded position but it can tolerate full sun if the soil remains moist during the hottest part of the year. Be aware that Skimmia reevesiana can show signs of chlorosis if overexposed to sun or planted on poor dry, soils. While it is not from the genus ericaceae, it is advisable to avoid planting in alkaline soils and instead provide a humus rich lime-free soil.

For related articles click onto the following links:
HOW TO GROW SKIMMIA REEVESIANA
HOW TO GROW SKIMMIA JAPONICA 'RUBELLA'
SKIMMIA ANQUETILIA
SKIMMIA JAPONICA 'RUBELLA'
SKIMMIA JAPONICA RUBELLA CARE
SKIMMIA REEVESIANA
SKIMMIA JAPONICA VEITCHII (FOREMANII)

WHEN AND HOW TO PRUNE COTINUS COGGYGRIA 'VELVET CLOAK'

When and how to cut back Cotinus coggygria 'Velvet Cloak'


Commonly known as the smoke tree due to the wispy 'smoke-like' appearance of its pinkish-purple feathery plumes, Cotinus coggygria 'Velvet cloak' is a striking, deciduous ornamental plant native to southern Europe, and continuing east as far as the Himalayas and northern China. Noted for its dark purple foliage (almost black when viewed from the distance), it is a multi-stemmed species with a rounded, loose-spreading habit.

When and how to cut back Cotinus coggygria 'Velvet Cloak'
Under favourable conditions, and once mature, you can expect Cotinus coggygria 'Velvet cloak' to reach and height of between 4-8 metres! Which of course will make it far too large for most people's gardens.

As a rule, pruning is not required, although straggly growths can be shortened or removed in March. Oversized specimens can be coppiced to maintain a manageable size. This will also encourage the plant to produce larger leaves but this will be at the expense of the following seasons blooms.

Coppicing is a pruning technique where a tree or shrub is cut to ground level. Cut all stems of Cotinus coggygria Velvet cloak'' to within 5-7.5cm of ground level. This can be done in late winter or early spring, just before they come into active growth. Be aware that on older specimens it can take a couple of seasons to come back into growth,

For related articles click onto the following links:
COTINUS COGGYGRIA 'ROYAL PURPLE'
WHEN AND HOW TO PRUNE COTINUS COGGYGRIA 'VELVET CLOAK'
WHEN AND HOW DO YOU PRUNE BACK GARRYA ELLIPTICA

HOW TO GROW SKIMMIA JAPONICA 'RUBELLA'

How to grow Skimmia japonica ' Rubella'


Skimmia japonica 'Rubella' is a gorgeous evergreen ornamental shrub noted for its long lasting ornamental buds. Originating from Japan, China and southeast Asia it has a compact habit which under favourable conditions can grow to a height and spread of approximately 1-1.5 metres.

How to grow Skimmia japonica ' Rubella'
Its glossy dark-green elliptic leaves are to 10cm long and once mature create a bold backdrop for the panicles of red buds which emerge in mid to late winter. The buds eventually open in the spring revealing creamy white, fragrant blooms. Be aware that Skimmia japonica and its cultivars are dioecious which means that male and female blooms appear on different plants. Skimmia japonica 'Rubella' is a male form as so will never produce the shiny red berries characteristic of other cultivars.

Suitable for growing in the ground or as a specimen container plant, Skimmia japonica 'Rubella' will require a dappled or fully shaded, and preferably sheltered position. Avoid full sun, as this can cause the leaves to bleach out to yellow or even white!

Plant in a moderately fertile, rich, well-drained soil. Although not from the family Ericaceae Skimmia japonica 'Rubella' can suffer from lime intolerance and so should be planted into soils which have a neutral to acidic pH. Be that as it may, it has proved to be tolerate a chalky soils but only once they have been improved with plenty of well-rotted organic matter.

Container grown plants will require as large a container that can be conveniently moved, use a soil based compost such as John Innes No.3 mixed with ericaceous compost.

Once established it is surprisingly hardy, tolerant of a wide range of conditions, including frost, drought and atmospheric pollution.

For related articles click onto the following links
HOW TO GROW SKIMMIA JAPONICA 'RUBELLA'
HOW TO GROW SKIMMIA REEVESIANA
SKIMMIA ANQUETILIA
SKIMMIA JAPONICA 'RUBELLA'
SKIMMIA JAPONICA RUBELLA CARE
SKIMMIA REEVESIANA

HOW TO GROW LEMONGRASS FROM SEED

How to grow lemongrass - http://edibleplantproject.org/


Lemongrass - Cymbopogon citratus, is widely used as a culinary herb in Asian cuisines with a subtle citrus flavour. Native to South and Southeast Asia, it is often sold in stem form. However to get the very best flavour consider growing your own from seed.

Lemongrass seeds - http://suburbantomato.com/
Even though lemongrass is a tropical plant it is surprisingly hardy. So much so that it is even possible to cultivate it outside in the southern regions of England and Ireland. Of course it will not tolerate any frost damage.

Sow lemongrass seed from late January to March on the surface of a good compost such as John Innes 'Seed and Cutting'. Do not place a layer of compost on top of the seeds as they need light to initiate germination.

Water by gently lowering the seed tray into a bowl of water, stopping once the compost has changed to a darker colour. Remove from the bowl and cover with a light layer of horticultural grit or vermiculite.

Image credit - http://plantaliscious.janetbruten.co.uk/
Place the seed tray in a propagator at a temperature of 20-25C (70-75F) or seal it inside a clear polythene bag. Keep the compost moist but not wet. Germination is often slow and intermittent, taking anywhere between 21-40 days before the seedlings emerge.

When seedlings are large enough to handle, they can be carefully pricked out and potted on into individual pots containing a good quality multi-purpose compost. From this point they can be kept in cooler conditions.

When lemon grass plants are well grown and all risk of frost has passed, acclimatise them to outdoor conditions over 7 to 10 days. Plant lemon grass outdoors, in a warm, sheltered spot at 30cm (12") apart, on moist, well drained soil, in full sun.

For related articles click onto the following links:
HOW TO GROW LEMONGRASS
HOW TO GROW LEMONGRASS FROM SEED
HOW TO GROW MINT PLANTS

HOW TO GROW POINSETTIAS

How to grow poinsettias

Native to Mexico and Guatemala, the poinsettia - Euphorbia pulcherrima, is a popular ornamental houseplant grown for the seasonal Christmas period. Also known as the Christmas star, it is noted for its dark-green foliage and rosettes of large, red bracts. The poinsettia has been associated with Christmas since the 17th century when Franciscan friars decorated their altars with the colourful stems.

How to grow poinsettias - https://herebydesign.net/
The poinsettias natural habitat are deciduous tropical forests, which put it at odds to the cold freezing temperatures experienced at Christmas time in northern Europe. Extreme temperatures, cold draughts and irregular watering are all known to cause leaf drop in poinsettias which is why they have a reputation for being difficult to care for.

Poinsettias require a stable minimum temperature of approximately 13-15°C. Even short periods of lower temperatures can cause environmental shock which can cause the plant to react by dropping its leaves. This exposure should be kept to a minimum, so making sure that they are well protected and covered when purchasing. Unfortunately it is not uncommon for plants to be chilled in transit from the growers prior to purchase.

How to grow poinsettias - http://www.naturemuseum.org/
When choosing your plant, favour specimens which have tightly closed flower buds and avoid those where the yellow pollen is visible on the flower clusters. This is because the red bracts will begin to naturally drop off once the plant has finished flowering

Once home place in a warm, bright position, but one which is out of direct sun. Avoid draughts, radiators and moving them between hot and cold temperatures too quickly.

Careful watering is particularly important as poinsettias are prone to root damage from waterlogged conditions. Of course the foliage will also wilt if kept to dry, so only water when the surface of the compost has begun to dry out.

Feed with a good quality houseplant fertiliser and mist regularly with tepid water to help extend the flowering period.

For related articles click onto the following links:
HOW TO GROW AECHMEA FASCIATA
HOW TO GROW POINSETTIAS
HOW TO GROW STROMANTHE SANGUINEA 'Triostar'
HOW TO GROW THE SWISS CHEESE PLANT - Monstera deliciosa
How to Care for Poinsettias
HOW TO TAKE CUTTINGS FROM POINSETTIA
POINSETTIA PESTS AND DISEASES
THE CHRISTMAS ROSE - Helleborus niger
THE HISTORY OF CHRISTMAS
THE PLANT HUNTERS
WHY IS MY POINSETTIA DROPPING ITS LEAVES?

WHY IS MY POINSETTIA DROPPING ITS LEAVES?


Poinsettias - Euphorbia pulcherrima, are a gorgeous addition to the Christmas table and as part of the seasonal floral decoration in general. Native to the tropical forests of Mexico and Guatemala, the plant's association with Christmas began in the 16th-century. Franciscan friars believed that the star-shaped leaf pattern symbolized the Star of Bethlehem, while the red coloured bracts represented the blood sacrifice of Jesus while he was on the cross.

When you take a tropical plant such as the poinsettia and expose it to the freezing temperatures of an English winter it is not surprising that some physical damage will occur as a result of environmental stress. For poinsettias, the typical reaction is to drop its leaves. Growers, transportation and retailers all make an effort to maintain suitable temperatures, although this is not always achieved. That being said, it is not only extremes of temperature that can cause this characteristic problem.

What causes leaf drop in poinsettias

Poinsettia leaf drop - http://www.iva.de/profil-online/haus-garten/
1. As previously mentioned, poinsettias will be prone to leaf drop if they become chilled. This typically happens when they has been unloaded for delivery and then left outside, or if a plant is placed in the boot of a car during cold to freezing temperatures. Poinsettias will need a minimum temperature of 13-15°C (55-59°F).

2. Assuming that the plants are in good condition when purchased, make sure that they are well wrapped before leaving the store and always transport inside the passenger area of the car and not the boot. Avoid buying from street stands or from outside retailers, and with regards to wrapping cover the plant right around the top of the foliage, or put it in a plastic bag so that it is completely protected.

3. An obvious one perhaps but once home do not place your poinsettia on a cold windowsill. Equally, do not place next to a strong heat source such as a radiator.

4. Be aware that poinsettias will naturally drop some leaves once flowering has finished. The ornamental red bracts are not true flowers but are instead a rosette of specialised leaves. If you look closely in the centre of the bracts the true flowers can be viewed. The flowers should be in tight bud when purchased to ensure the plant remains in good condition for as long as possible.

5. Watering can also be a factor in leaf drop. As poinsettias are from the genus Euphorbia (well known for its drought tolerant species), water sparingly as overwatering can easily damage plants roots. This will again trigger the poinsettia to drop its leaves. As a rule of thumb, only water poinsettias when the surface of the compost has begun to dry out. Do not allow the compost to dry out completely.

6. Avoid placing in a draught, and in particular cold draughts.

For related articles click onto the following links:
How to Care for Poinsettias
HOW TO GROW POINSETTIAS
HOW TO TAKE CUTTINGS FROM POINSETTIA
POINSETTIA PESTS AND DISEASES
THE CHRISTMAS ROSE - Helleborus niger
THE HISTORY OF CHRISTMAS
WHY DO POINSETTIAS DROP THEIR LEAVES

HOW TO GROW MAMMILLARIA FROM SEED

How to grow Mammillaria from seed - image credit Ryan Benoit


The majority of species and cultivars can be propagated from cuttings or offsets, however all can be easily grown from seed. Just be aware that selected cultivars and hybrids will not grow true to the parent plants.

Mammillaria fruits and seeds
All Mammillaria seeds are small; in fact they will seldom exceed 1 m in diameter or length. So to make sowing easier use a toothpick with the tip moistened to lift each seed and set it in place on the compost. For very fine seed mix well in with some fine, dry, silver sand, and sow the seed/sand mix across the surface of the compost.

Using a good quality cactus compost, fill suitable pots, pan or a modular seed tray to 1-2 cm from the top of the pot. If proprietary composts are not available then you can consider creating your own mix using 1 part of loam based compost (John Innes No 3), 1 part washed, sharp sand and 1 part of fine vermiculite. Mix thoroughly and then put through a 5mm sieve.

Newly germinated Mammillaria seedlings
Good quality proprietary composts should all have been heat treated prior to packing to ensure the product is sterile. If you are keen to maintain sterile condition, and even then only using only plastic products, place the filled pots into a tray and carefully add boiling hot water to the compost until the water reaches to just below the rim of the pots. Leave to stand until the compost in the pot has become soaked through. Avoid boiling plastic pots as they can become misshapen, instead clean with a bleach solution before rinsing thoroughly. Previously used terracotta pots can be boiled, but only by starting off in cool to warm water before heating up. Adding terracotta pots directly in to boiling water can cause them to crack.

How to grow Mammillaria from seeds
Once cooled, the seeds can be sown sparsely onto the surface of the compost and then pressed into the surface. Do not bury the seed. Add a thin layer of vermiculite to the surface of the compost to help prevent the seeds from moving when watered. Water gently in and continue to keep the water moist throughout the germination process. Never allow the compost to become waterlogged. Tap water is preferable to rainwater.

Move the pots or trays to a heated propagator and maintain a temperature of between 75 and 85 degrees Fahrenheit. With fresh seed you can expect a germination rate of between 40-50% with the first seedlings emerging after 5-7 days, and then with the rest appearing after 4 weeks. Older seeds will have a lower rate of germination and can take up to a month before they start to emerge.

Unlit they are about 3mm wide the seedlings will be just featureless green globules, but after after a month the first signs of spines will appear at the top. pricking out should not be attempted until at least a year has passed. By thus time the seedlings will be robust enough to withstand handling without too much risk of root damage. When replanting take care to ensure that the soil level is not higher than it was in its original container.

For related articles click onto the following links:
HOW TO GROW MAMMILLARIA FROM SEED

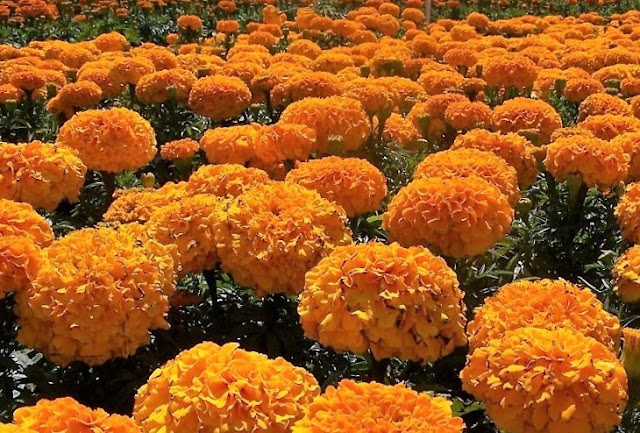
HOW TO GROW AFRICAN MARIGOLDS

How to grow African Marigolds

Closely related to the magnificent sunflower, the African marigold - Tagetes erecta is a comparatively sturdy species with upright growth, aromatic foliage and showy blooms. The common name however is surprisingly misleading. Rather than Africa, the African marigold is actually a native to Mexico - where it is more appropriately known as the Aztec marigold.

How to grow African marigolds
The African marigold is a popular ornamental, half-hardy annual garden plant with double flower-heads which under favorable conditions can be expected to grow to approximately 30 cm. That being said some cultivars can grow up to 50 cm! It has a well-branched, erect habit (hence the species name) with dark-green, deeply-cut foliage.

The blooms are approximately 5 cm across and can come in a variety of colours ranging from creamy-white to lemon-yellow to a deep orange. The flowers usually appear in July and will continue to bloom until the first frosts.

African marigolds will grow well in any well-cultivated site, even in poor, rather dry soil. However for best performance plant into a moderately rich soils in an open sunny position.

You do not need to deadhead African Marigolds, in order to promote further blooms but it will keep a tidier look to the plants as well as improve the growth habit and flower size.

For those growing African marigolds F1 hybrids under protection, you can encourage them to bloom earlier as well as for longer by limiting their light period to 8 hours a day for 30 days during the seedling period.

In bedding displays plant African marigolds 30 cm apart. Be aware that young plants can be prone to attack from slugs and snails, but this incidence is reduced as the plants mature. The spent flower heads can also be susceptible to grey mold in wet weather.

For related articles click onto the following links:
HOW TO GROW CORNFLOWERS FROM SEED
HOW TO GROW OSTEOSPERMUM FROM SEED

HOW TO GROW A CHRISTMAS TREE FROM SEED

How to grow a Christmas tree from seed

The common name 'Christmas tree' encompasses a large rage of both genera and species, in fact unscrupulous dealers will name any tree as a 'Christmas tree' if they think that it will encourage sales. That being said, most Christmas trees are conifers and as such will require similar growing conditions. So when it come to growing a Christmas tree from seed the same technique can usually be applied across the genera.

Root trainer torpedo pot
Arguably the most popular Christmas tree species, at least in England, is the good old Picea abies, commonly known as the Norway spruce, and closely followed by the Nordmann fir. In the United States you are more likely to find the Fraser or Douglas fir.

The key to the successful cultivation of conifer seeds of to use either deep modular seed trays (root trainer pots) or long-tom pots. This is because conifers seedlings have deep roots. Use shallow pots and trays and the roots will spiral, affecting their continual growth.

Conifer seeds are best sown from February to March. Using a good quality compost such as John Innes 'Seed and Cutting', fill your seed containers to approximately 1 cm from the top. Sow one seed per container and apply a thin covering of horticultural grit or vermiculite. Gently water in so that the seeds are not disturbed and place outside into a cold frame. Come the following spring, root trainer seedlings can either be potted on into 2-3 litre pots containing a soil-based, ericaceous compost or planted outside into nursery beds with a 1-1.5 metre spacing. Pot grown specimens can be potted on as necessary, while open ground plants can be grown on for 2-3 years before being moved to their final position.

To create the typical Christmas tree shape it is essential to maintain a single leader. If forking or competing side shoots occur, the shoot furthest away from the main axis should be removed flush to the truck in March or April. To produce the even, compact, pyramidal shape, lightly trim each year, again in March or April.

For related articles click onto the following links:
CAN I GROW A CHRISTMAS TREE FROM SEED?

HOW TO GROW WINTER JASMINE

How to grow Winter Jasmine


The are few winter flowering plants available for northern European climates but the Winter Jasmine - Jasminum nudiflorum is one of the best. However unless given favorable growing conditions it can prove to be a rather weak and untidy specimen. This is because rather than the climbing plant that it is usually sold as, it is instead a loosely-structured, deciduous shrub.

How to grow Winter Jasmine
Native to northern China, it was first collected for Western science in 1844 by the well-known Scottish plant hunter Robert Fortune (1812 – 1880). It was subsequently named by English botanist John Lindley FRS (1799 – 1865) and published in the Journal of the Horticultural Society of London in 1846

Under favorable conditions you can expect the winter jasmine to achieve a height and width of approximately 3 metres. It has long, arching branches, with small, trifoliate leaves.

The solitary, bright yellow flowers are  2.5cm in width and appear on the naked green stems (hence the species name) from November to February.

The Winter Jasmine is as tough as old boots and will even tolerate cold, sunless, north walls. Be that as it may the blooms are easily damaged and so it is best cultivated as a wall shrub trained against a wall (preferably south facing) to provide extra warmth and shelter. However it also works well as a ground cover plant in amenity planting schemes.

You can grow Winter Jasmine in any ordinary, well-drained soil.

When grown as a wall shrub any long or untidy growths can be cut back after flowering. Ground cover specimens can be cut back down to within 10 cm of ground level also after flowering.

Jasminum nudiflorum received the Award of Garden Merit from the Royal Horticultural Society in 1984.

For related articles click onto the following links:
HOW TO GROW WINTER JASMINE
JASMINUM BEESIANUM
JASMINUM NUDIFLORUM - The winter jasmine